Activity: Chronology, Dating, and Seriation
LEARNING OBJECTIVE: To develop your understanding of archaeological formation processes and seriation.
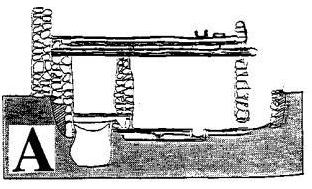
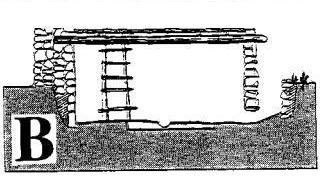
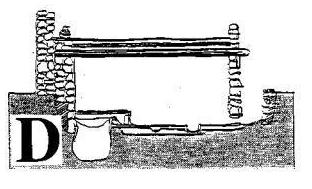
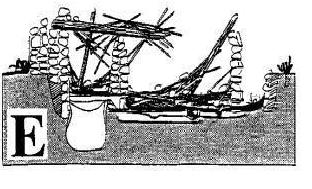
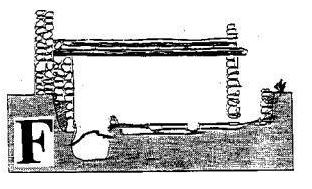
PART 1. Your task in this exercise is to investigate the order of events at an archaeological site based on your newly developed understanding of site formation processes (Chapter 2) and relative dating (Chapter 4). For this activity, please determine the chronological sequence from oldest (earliest dating) to latest (most recent) of this habitation structure. Explain what took place in each of the seven stages that leads you to conclude the order of events at this site. Pay attention to possible hearths, living floors, and storage pits among other aspects of this site.
Right click on each image and save it on your answer sheet in the correct order. Write up your answers and explanations for this Activity, save as a PDF or Word document, and upload to Blackboard. The evaluation on this activity is more about the quality of your archaeological thinking and argument than whether you place the illustrations in the correct order. You should apply what you are learning in the class and textbook to determine your answer rather than guessing or relying on common-sense notions.
Notes: the images are side views that include a structure and the soil below. Image G is different from the others in perspective as the view is from further back than the others. Ignore that the vertical rock wall on the right side appears to be floating in the air.
|
|

|
|
|
|

|
PART 2. Please go to this webpage (click link) and read about seriation. Then complete the seriation activity on the next page. At the bottom of the interactive graphic are boxes where you are to type in the letter of the sites (a through j) in proper chronological order from oldest (lower/bottom of page) to youngest (higher). If you have some incorrect answers after you select the "Check" button, I recommend you not select the "Reset" button as this will completely reset the location of all of your sites/strips. You do not need to answer the questions at the bottom of the seriation activity.
After you have all of the sites in the correct chronological order, paste your results into the same document with your answers to Part 1. There are several ways you can do this: (1) take a screen shot using Microsoft's Snipping Tool, (2) right click within the graphics of the exercise and select "Print" from the dialog menu that pops up. Then, select a new printer: "Name: Adobe PDF" or something similar such as putting a check box in "Print to File" in the dialog box. Select "OK" , or, (3) you can "Print Screen." Upload to Blackboard your completed and correct seriation as the resulting pdf or, place images into a Word document and upload.
Merge the two Parts into a single document and upload on Blackboard or upload as two separate documents. If you have trouble saving your results as a pdf or uploading, print out your results and bring to class to submit.
Assessment criteria click here.
These activities were adapted from other instructors' work; citations provided upon request.
